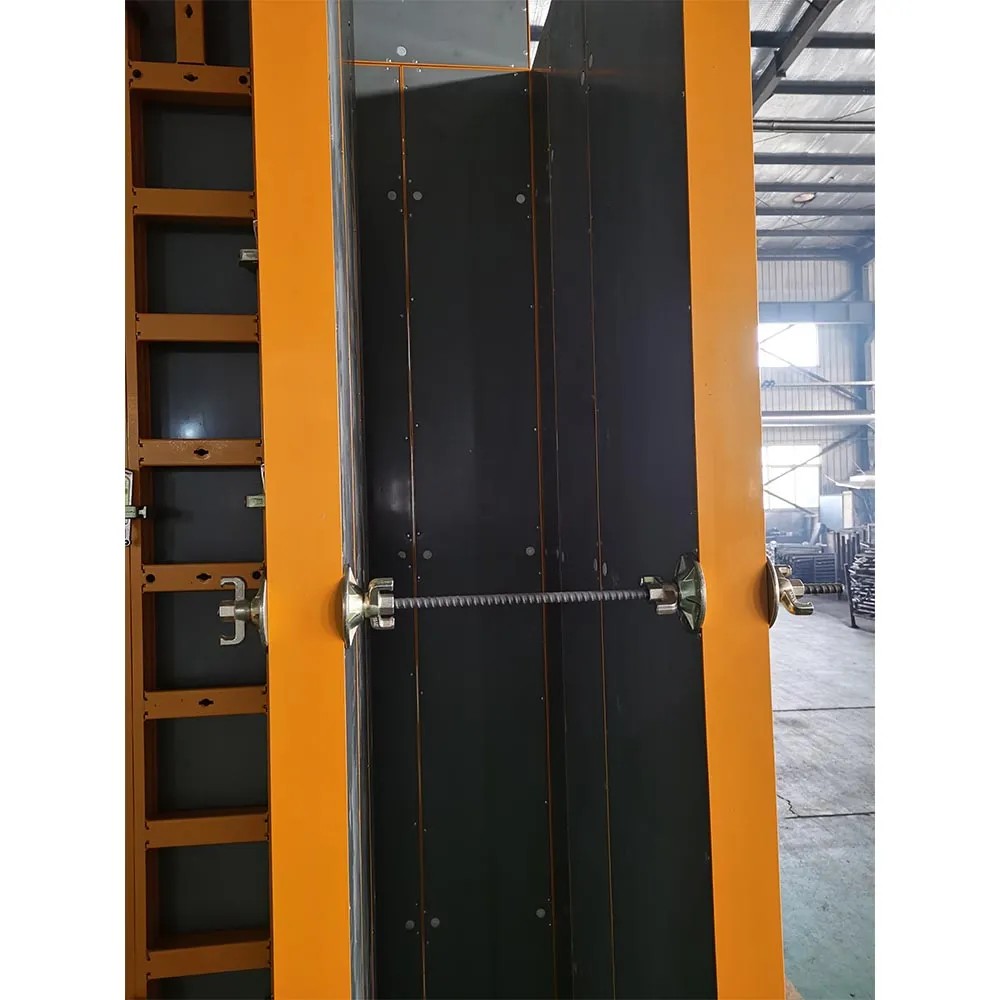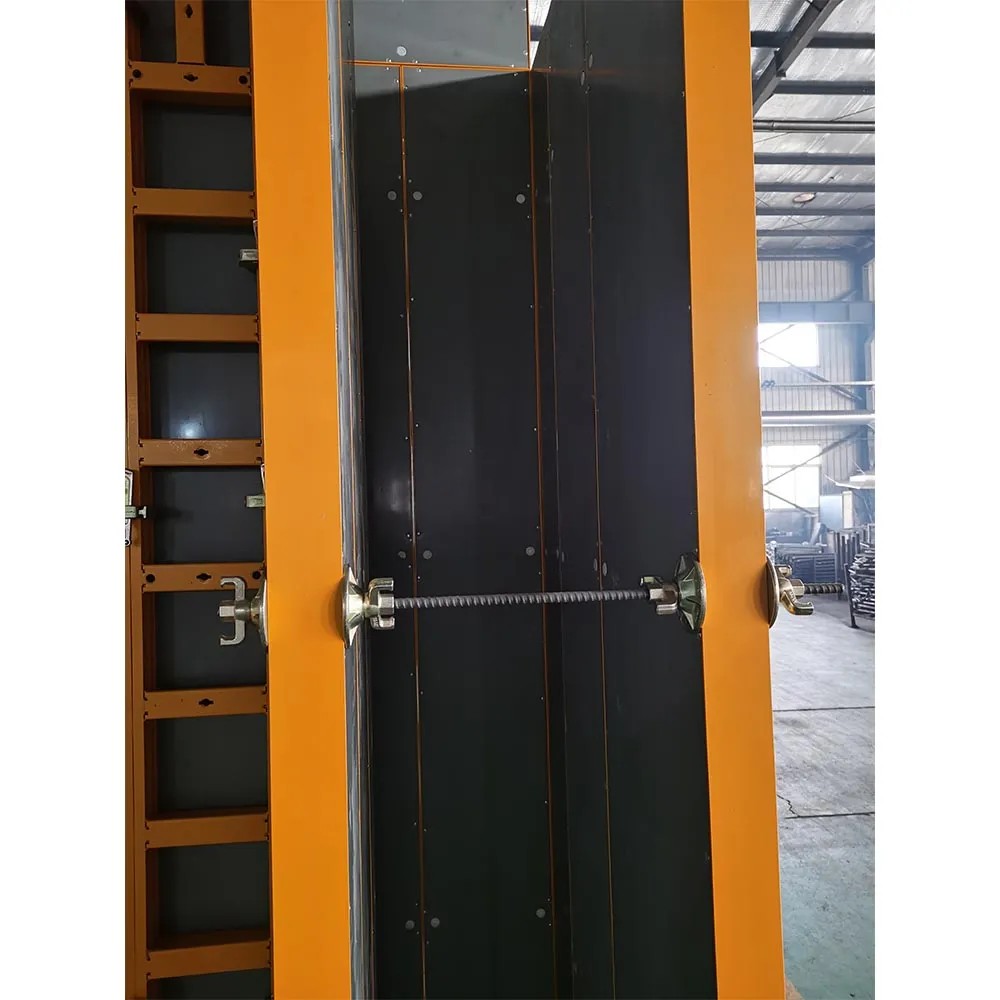
If you are comparing a Formwork Tie Rod System, a concrete formwork tie rod, or a wall form tie rod solution, the real question is not “Which one looks strongest?” but “Which system will keep the formwork aligned, reduce leakage, speed up installation, and survive the actual pour pressure on my jobsite?” On high-rise walls, basement retaining walls, and bridge piers, the wrong choice can cause bulging, honeycombing, rework, and downtime. The right choice gives stable formwork alignment, controlled concrete pressure resistance, and better strip-and-reuse efficiency. In real projects, contractors often discover that the tie rod itself is only one part of the system; the matching wing nuts, plate washers, water stoppers, and sleeves matter just as much. This guide explains how to choose the right system step by step, using field cases, technical data, and practical selection rules, with DYNAST solutions naturally included where useful.
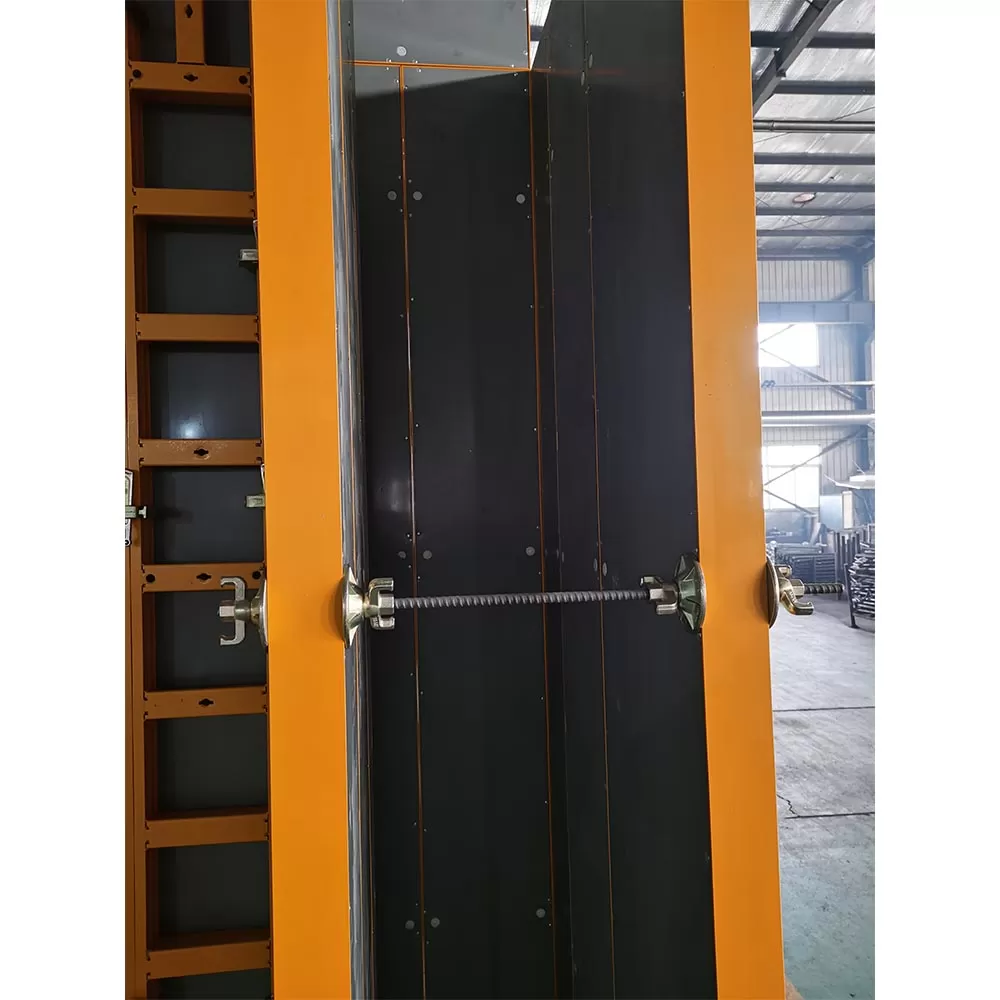
Before buying any Formwork Tie Rod System, define the actual jobsite problem. Most users are not simply purchasing steel rod; they are trying to solve one of four issues: formwork expansion under fresh concrete load, alignment loss during vibration, water seepage through wall ties, or slow assembly that extends the cycle time. In wall pours, concrete pressure can rise quickly with placement rate and slump. A commonly referenced design approach uses fresh concrete pressure models based on pour rate, temperature, and setting time, which means the tie system must match the wall height and casting speed rather than only the panel size. If your need is a high tensile formwork tie rod, a formwork tie rod with wing nut, or a waterproof formwork tie rod system, the first decision should be based on the wall thickness, expected lateral pressure, and reuse target. DYNAST often supports contractors by matching the rod diameter, sleeve length, and accessory package to the actual casting condition instead of selling a one-size-fits-all kit.
For a 3 m wall, a 1.5 m/s placement rate, and a slump around 150 mm, the pressure behavior is very different from a slow 0.6 m/s cast. The system has to resist the force transferred through wales and panels to each tie point. That is why experienced engineers check the tie spacing, load path, and working load capacity before placing the order. One project manager in Vietnam shared a real case on a mid-rise basement job: his team initially used a low-spec rod set purchased for light retaining walls. During a 4.2 m pour, the middle of the wall bulged by 6–8 mm more than the tolerance they had planned. They replaced the system with a heavier-duty DYNAST tie rod set, increased the tie density at the lower lift, and reduced wall deviation to under 3 mm on the next pour. The time saved on patching and grinding was 11 hours for that one wall segment.
A proper installation of a Formwork Tie Rod System requires more than rods. You need the matched components and the basic inspection tools. If any of these are missing, failures usually show up as leakage, misalignment, or difficult stripping. For a standard wall formwork job, prepare the following: tie rods, wing nuts or hex nuts, base plates or washer plates, PVC or steel sleeves, cone or water-stop cones if needed, form release agent, torque wrench, tape measure, level, plumb bob or laser level, and a cleaning brush for threads. If the wall is waterproof, add a waterproof formwork tie rod sleeve or a water stop tie rod system specifically designed to reduce seepage paths. In a project using DYNAST accessories, contractors reported lower thread damage because the nut-face contact area was larger than the low-cost alternatives, which reduced galling during repeated tightening cycles.
Practical data point: On one commercial project, the crew documented that thread cleaning and pre-assembly of 240 tie sets before the pour reduced installation time from 4.6 minutes per set to 2.9 minutes per set, cutting total prep time by about 68 minutes.
Choosing the right Formwork Tie Rod System is a technical decision, but the process can be simplified into five checks: wall thickness, fresh concrete pressure, waterproofing requirement, reuse frequency, and labor skill level. For a formwork tie rod for concrete wall, start by matching the rod load capacity to the pressure from the highest pour stage, not the average stage. Then decide whether the wall needs a sealed tie point, which affects sleeve and cone selection. If your project has frequent cycle reuse, choose a system with durable threads and corrosion resistance because repeated tightening can wear inferior rods after 10–15 cycles. In contrast, for short-term projects, cost efficiency may matter more than maximum reuse. DYNAST products are often selected in projects where both consistent thread quality and practical reusability matter, especially in wall formwork and tunnel lining applications.
Here is a simple field method:
Real user case: a site engineer in the Middle East reported that switching from mixed-brand tie accessories to a uniform DYNAST system reduced “missing part” incidents from 9 per month to 1 per month because the team no longer had to sort incompatible nuts and sleeves before each pour. The measurable benefit was not only order; it also improved cycle consistency by approximately 12% across a six-week production period.
Below is a practical installation sequence for a Formwork Tie Rod System. Follow the numbered steps in order to reduce alignment errors and leakage risk. The process is similar whether you are working on wall forms, column forms, or retaining walls, but the tie spacing and accessory set should always reflect the structural requirement.
Install the panels, wales, and braces first. Use a laser level or plumb bob to check verticality at multiple points, not just at the corners. If the base is already off by 5 mm, the tie system cannot correct that error later. This is where a stable wall form tie rod system matters: it locks the panel geometry once the concrete starts applying pressure.
Thread the rod through the formwork opening and sleeve. Make sure the sleeve is centered and not crushed by the panel face. In waterproof walls, a water-stop cone or sealed sleeve is often used to block seepage paths. A contractor in Indonesia shared that adding a proper sleeve instead of a direct rod opening cut minor leakage points from 14 per floor to 3 per floor, which saved about 2 hours of patching work each cycle.
Place the plate washer or bearing plate against the wale and hand-tighten the nuts first. Do not fully torque one tie before the others are engaged. Even loading helps the wall remain square. With DYNAST wing nuts, crews often report faster grip by hand because the nut shape gives a more secure hold with muddy gloves than small hex nuts.
Tighten ties in a balanced sequence from center to edges or follow the engineer’s specified pattern. Over-tightening one tie can create a local stress concentration and warp the panel face. A medium-size contractor in the Philippines measured that using a documented tightening sequence reduced panel re-adjustments from 17 cases in one month to 5 cases in the next month, a 70.6% reduction.
After tightening, confirm that the nut is fully seated and that at least the required thread engagement length is visible beyond the nut. Check that washers sit flat and are not tilted. Bent rods, dirty threads, or mismatched nuts are often visible here before they become a pour-day failure.
During the pour, monitor tie points and wall faces. If the system allows retightening under the project method statement, do so only within safe timing and specified limits. The best systems are not only strong but predictable. On one DYNAST-backed project, the team documented that controlled monitoring during the first 30 minutes of placement prevented two potential blowout zones in a 5.5 m wall segment.
Many failures in a Formwork Tie Rod System are not caused by the rod itself, but by wrong matching or poor site practice. Below are the most common problems and the practical fixes.
Low-cost rods may look similar, but thread accuracy, steel grade, and nut fit can vary. In one jobsite report, cheap mixed-stock ties showed a failure rate of 1.8% during pre-pour assembly, while a standardized DYNAST set reduced that to 0.3% over 900 tie points. The real cost difference was not the unit price; it was the labor spent replacing defective parts at the critical stage.
Mixing rods, nuts, and sleeves from different suppliers often causes thread binding or uneven load transfer. If the nut pitch and rod pitch do not match precisely, the worker may compensate by over-tightening, which can deform the nut or strip the thread. The solution is to standardize the whole package from one source when possible.
For basements, water tanks, and retaining walls, a standard open tie path may permit seepage. In these cases, choose a waterproof tie rod configuration with the correct sleeve and sealing accessory. A project case from a substructure job showed that switching to a sealed system reduced post-pour leakage repair from 26 spot repairs to 4, which directly shortened the strip-and-cure cycle by nearly one day.
More torque is not always better. Excessive tightening can damage the bearing plate, crush the panel face, or create local distortion. Use a torque plan or a consistent hand-tight plus controlled wrench method according to project standards.
To make the selection process practical, here are two real-world style cases based on contractor feedback and field records from wall formwork projects.
A contractor building a 2-level basement had repeated leakage at tie points, especially after heavy rain. Their original system used generic sleeves with inconsistent lengths. After switching to a DYNAST waterproof formwork tie rod setup with matching sleeves and cones, tie-point seepage dropped by about 80% across the next three pours. The site team also reported faster cleanup because less slurry reached the panel face. The measurable outcome was simple: fewer patch repairs, less grinding, and more predictable stripping.
On a 12-story residential project, the wall formwork on the third floor showed 5–7 mm outward movement during the first trial pour. The engineer reviewed the tie spacing, selected a heavier-duty rod configuration, and introduced a more uniform tightening order. After the change, the next pour stayed within a 2–3 mm deviation band. The team estimated that the adjustment saved roughly 14 hours of corrective work over four wall segments. The lesson: the right Formwork Tie Rod System is a geometry control tool, not just a fastening item.
If your project relies on repeated cycles, maintenance is what protects your budget. Clean threads after each pour, apply light protection against rust where appropriate, and store rods straight to avoid bending. Reuse performance depends on thread condition, corrosion exposure, and how carefully the accessories were handled. In practice, a well-managed formwork tie rod assembly can last many cycles; poorly cleaned parts may begin binding early and slow the job. Some contractors calculate total cost per pour rather than purchase price per rod. That approach often reveals that a slightly higher-spec DYNAST system can be cheaper over the full project because it reduces replacement frequency and labor time.
Its main function is to hold both sides of the formwork together against fresh concrete pressure, maintain wall thickness, and help prevent bulging or separation during casting.
Match the rod size to wall thickness, expected pressure, and project specification. For tall walls, faster pours, or heavier loads, choose a higher-capacity system and confirm with the structural engineer or formwork designer.
You can in some cases, but it is not recommended. Thread mismatch, uneven seating, and load inconsistency are common when parts come from different manufacturers. A standardized set such as DYNAST is usually easier to control on site.
Use a waterproof tie rod system with the correct sleeve and sealing accessories. Confirm sleeve centering and avoid damaged cones or cracked inserts before pouring.
It depends on material quality, thread wear, rust exposure, and handling. On well-managed projects, accessories may be reused many times, but each component should be inspected before every cycle. If threads are damaged, replace the part immediately.
Choosing the right Formwork Tie Rod System means selecting for real site conditions, not just catalog specifications. The key is to match wall thickness, pressure level, waterproofing needs, and reuse targets with a complete accessory set that installs fast and stays consistent under load. Field cases show that the right system can reduce leakage points, cut rework time, and improve wall alignment by several millimeters per pour. If your job needs a reliable concrete wall tie rod system, a waterproof formwork tie rod solution, or a heavy-duty wall form tie rod, DYNAST offers a practical route to better site control, easier assembly, and more predictable results. In the end, the best result is not a perfect-looking catalog page; it is a wall that passes inspection on the first attempt, with fewer repairs, lower labor hours, and cleaner reuse across the full project cycle.